
How to Position Windows for Better Ventilation
A homeowner’s guide to window placement, cross ventilation and passive cooling — for hot, humid, dry and temperate climates.

Why This Matters
Window Ventilation Design is one of the few building decisions that costs nothing extra but changes how a home feels every single day. The same wall opening can either pull a steady breeze through your living room or trap stale, humid air for hours. The difference is not the window itself — it is where you place it.
Most homes lean entirely on fans and air conditioners to move air. That works, but it runs up electricity bills and still leaves rooms feeling stuffy the moment the power goes out. A well-placed window does the job for free, every hour of the day, in every season.
💡 KEY INSIGHT
Window placement has a bigger impact on indoor comfort than window size. A small, correctly positioned opening on the windward and leeward sides of a room often outperforms one oversized window on a single wall.
This guide focuses on the physics homeowners actually need: how moving air cools a body, how pressure differences pull breeze through a house, and how to apply both ideas to real floor plans across different climates. By the end, you will be able to look at any room and know exactly where the next window, vent or door should go.
Who Is This Guide For?
This guide is written for four kinds of readers. Find your card below to see what you will get out of it.
⌂
Homeowners Renovating
You are adding or moving windows during a renovation and want to avoid placing one in the wrong spot, killing airflow you already had.
▦
Homeowners Building New
You are working with an architect on a new house and want to ask informed questions about window position before the drawings are final.
☺
First-Time Self-Builders
You are managing your own construction in a hot or humid climate and need a practical, no-jargon framework for passive cooling.
❋
Sustainability-Minded Owners
You want to cut mechanical cooling costs and are looking for design-stage decisions that reduce long-term energy use.
Quick Navigation
Jump to the section most relevant to where you are in your project.
| ◈ 1. How Airflow Actually Works The two forces — wind pressure and the stack effect — that move air through a home. | ↔ 2. Window Placement Matrix Where to put inlet and outlet openings for single-sided, cross and stack ventilation. |
| ≈ 3. Cross Ventilation in Practice Room depth, opening size and the inlet-outlet relationship that determines airflow. | ☀ 4. Climate-Specific Strategies How window placement should change for hot-dry, hot-humid, temperate and cold climates. |
| ◆ 5. Common Mistakes to Avoid The placement errors that quietly cancel out otherwise good ventilation design. | ✓ 6. Airflow Checklist & Planner A practical, room-by-room checklist plus your downloadable Natural Ventilation Planner. |
| ▭ 30-Day Action Plan A week-by-week plan to audit, improve and reduce reliance on mechanical cooling. | ▣ FAQs Quick answers to the five questions homeowners ask most about window ventilation. |
1. How Airflow Actually Works
Before deciding where to put a window, it helps to understand what actually moves air through a building. Two forces do almost all the work: wind pressure and the stack effect. Every window placement decision in this guide comes back to one or both of these.
Wind Pressure: Why Windows Need a Partner
When wind hits a building, it pushes against the windward wall, creating higher air pressure there. At the same time, it creates lower pressure on the leeward wall — the side facing away from the wind. Air always moves from high pressure to low pressure, which is why a single window rarely creates a real breeze. It needs a second opening on a lower-pressure wall to pull air through.
This is the basic logic behind cross ventilation: one opening lets air in, a second lets it out, and the pressure difference between them does the work. The bigger that pressure difference and the more directly the two openings line up, the stronger the airflow.
The Stack Effect: Free Cooling From Temperature Alone
Warm air is lighter than cool air, so it naturally rises. In a room with no wind at all, you can still move air by placing a low opening and a high opening on the same or different walls. Warm air escapes through the high opening, and that vacuum pulls cooler air in through the low one. This is called the stack effect, and it works even on still, windless days.
💡 KEY INSIGHT
Wind pressure and the stack effect are not competing strategies — they work together. A window placed low on a windward wall and a vent placed high on a leeward wall uses both forces at once, which is why this configuration consistently outperforms single-mechanism designs.
Why Window Position Beats Window Size
A large window in the wrong spot can move less air than a small one placed correctly. Position determines whether moving air actually crosses the space people occupy, rather than skimming along one wall and leaving the center of the room untouched.
Research on building airflow backs this up. Studies on cross-ventilated buildings have found that the position of the inlet opening has a much bigger effect on airflow and contaminant removal than the position of the outlet — so if you can only get one opening right, prioritize where air enters, not where it leaves.
How This Plays Out Across Climates
In Mumbai or Bangkok, where humidity sits high year-round, moving air across skin is often the only realistic passive cooling strategy, since evaporative cooling needs dry air that simply is not available. In Phoenix or Riyadh, the priority flips — keeping hot daytime air out matters more than moving it, and ventilation strategy shifts toward night-time flushing. We will return to these climate differences in Section 4.
✅ TIP
Stand in a doorway on a breezy day and notice which way loose papers or curtains move. That is your dominant local wind direction, and it should guide which wall becomes your primary inlet.
Once you know that direction, the next question is what happens when placement goes wrong — and one mistake shows up more than any other.
⚠️ COMMON MISTAKE
Assuming any two open windows create cross ventilation. If both openings sit on the same wall, or on adjacent walls with no clear path between them, air recirculates near the opening instead of crossing the room.
2. The Window Placement Matrix
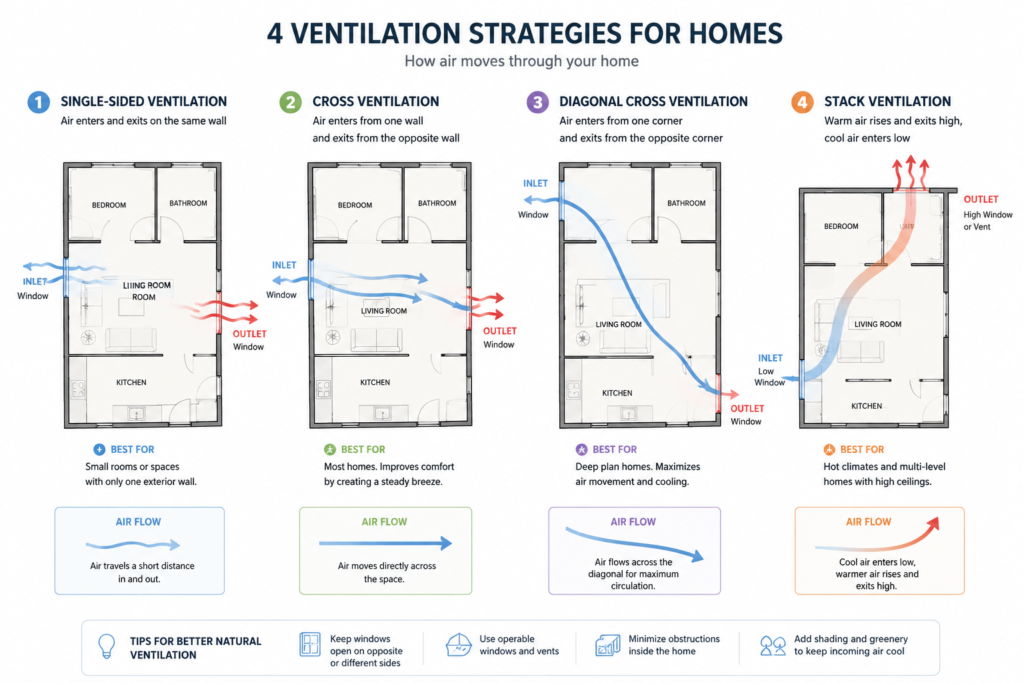
Not every room can have openings on two opposite walls. The right placement strategy depends on how many exterior walls a room actually has access to. Use the matrix below to find your situation and the placement rule that applies to it.
Single-Sided Ventilation
This applies when a room has only one exterior wall — common in apartments, rowhouses, and rooms along a shared corridor. Air enters and exits through the same wall, driven mostly by turbulence and small pressure fluctuations rather than a strong through-breeze.
Two openings on the same wall, spaced apart and ideally at different heights, perform far better than one. Guidance on natural ventilation design also caps how deep a single-sided room can be: room depth should not exceed about 2.5 times the ceiling height, or the air at the back of the room barely moves at all.
Cross Ventilation
This is the strategy this guide focuses on most, because it is the most effective option available to typical homes. It needs two openings on different walls — ideally opposite walls, though adjacent walls at a corner still work if there is a clear path between them. The same natural ventilation guidance allows room depth to extend up to roughly 5 times the ceiling height when true cross ventilation is achieved, double what single-sided ventilation supports.
Stack (Vertical) Ventilation
This uses height instead of depth. A low opening near floor level and a high opening — a clerestory window, vent, or stairwell opening — let warm air rise and escape while pulling cooler air in below. It is especially useful in rooms that cannot get a second exterior wall, like interior bathrooms or stairwells, and it keeps working even when there is no wind at all.
💡 KEY INSIGHT
Pick your strategy based on how many exterior walls a room has, not based on preference. A room with only one exterior wall cannot achieve true cross ventilation no matter how the single window is placed — pair single-sided rules with a stack vent instead.
Window Placement Matrix
Use this matrix to match your room layout to the correct opening strategy.
| Room Layout | Best Strategy | Inlet Position | Outlet Position | Max Room Depth |
| One exterior wall | Single-sided | Low, on exterior wall | High, same wall, spaced apart | 2.5x ceiling height |
| Two opposite exterior walls | Cross ventilation | Low, windward wall | High, leeward wall | 5x ceiling height |
| Two adjacent exterior walls (corner room) | Cross ventilation (diagonal) | Low, windward wall | High, adjacent wall | 5x ceiling height |
| No exterior wall access | Stack ventilation | Low vent from corridor or adjoining room | High vent, clerestory or shaft | Limited by vent height, not depth |
✅ TIP
If your room only has one exterior wall, ask whether a transom window or louvered vent above the interior door can borrow airflow from an adjoining room with a second exterior wall. This effectively converts single-sided ventilation into a weaker form of cross ventilation.
That fix works because it restores a height difference between inlet and outlet. Skipping that height difference is itself one of the most common placement errors homeowners make.
⚠️ COMMON MISTAKE
Placing both the inlet and outlet at the same height. This wastes the stack effect entirely and leaves you relying on wind pressure alone, which disappears on calm days.
The diagram below maps all four strategies from the matrix onto simple floor plans, so you can match your own room layout at a glance.
3. Cross Ventilation in Practice
Cross ventilation looks simple on paper — air goes in one side, out the other — but three details decide whether it actually works: how the openings line up, how big they are relative to the room, and what sits between them.
The Cross Ventilation Diagram
Picture a rectangular room with the prevailing wind hitting one wall directly. The inlet window sits low on that windward wall. The outlet window sits on the opposite, leeward wall, placed higher than the inlet. Air enters low, rises slightly as it warms from body heat and equipment in the room, and exits high — combining wind pressure with the stack effect along a single, diagonal path through the occupied zone.
The path between the two openings matters as much as the openings themselves. A direct, unobstructed line between inlet and outlet moves far more air than a path broken up by walls, tall furniture, or a closed interior door.
Sizing Your Openings
Bigger windows do not automatically mean more airflow, but openings that are too small will always limit it. Building codes and design guidance converge on a workable range for homes.
- A widely used rule of thumb sets openable window area at 10 to 20 percent of a room’s floor area for adequate ventilation and daylight in living spaces.
- US residential energy code allows a cross-ventilation credit when operable openings reach at least 12 percent of the room’s floor area, split across two or more windows.
- In hot, humid climates, design guidance for tropical buildings sets an upper limit too — total window area generally should not exceed about 25 percent of floor area, since larger openings start working against heat and glare control.
💡 KEY INSIGHT
Aim for openable window area between 12 and 20 percent of your room’s floor area, split across two opposite or adjacent walls. Below 10 percent, airflow becomes noticeably weak. Above 25 percent, you start trading ventilation gains for heat gain and glare problems.
Inlet and Outlet Size Relationship
The relationship between inlet and outlet size also changes performance. Research on opening configurations has found that making the outlet somewhat larger than the inlet, in ratios around 1:1.5 to 1:2.5 depending on building height, tends to improve airflow compared with two equally sized openings, because the larger outlet reduces resistance to air leaving the space.
For a typical home, this means a slightly larger or fully-open outlet window paired with a slightly smaller, more controllable inlet window gives you both strong airflow and the ability to dial it back during storms or cold spells.
Cross Ventilation Diagram — Description for Layout
| Element | Placement | Purpose |
| Inlet window | Low on windward wall, sill height 0.6–0.9m | Captures cool, fresh air at occupant level |
| Outlet window | High on leeward wall, opposite or diagonal | Releases warm air using pressure drop and stack effect |
| Airflow path | Straight line between inlet and outlet | Maximizes contact with occupied zone |
| Internal doors | Kept open or louvered along the path | Prevents the path from being blocked |
✅ TIP
If you can only adjust one window’s size, make the outlet larger. Research on opening ratios consistently shows outlet size matters more for total airflow than inlet size once both openings are reasonably sized.
Getting that ratio right only pays off if the air can actually reach the outlet in the first place — which is where most real-world setups quietly fail.
⚠️ COMMON MISTAKE
Hanging heavy curtains, blinds, or placing a wardrobe directly across the airflow path. Even a fully open window loses most of its effect if the air cannot travel in a straight line to the opposite opening.
4. Climate-Specific Window Strategies
The same cross-ventilation principle applies everywhere, but how aggressively you use it — and when — changes by climate. A homeowner in Chennai and a homeowner in Phoenix should not place windows the same way, even though both are dealing with heat.
Hot and Humid Climates
This covers most of coastal India, Southeast Asia, and similar regions. Humidity makes evaporative cooling unreliable, so moving air across skin is the main passive cooling tool available. Keep windows open during the day whenever security and weather allow, prioritize large, low-level inlets facing the prevailing breeze, and avoid deep room layouts that trap still air in the center.
Hot and Dry Climates
This covers much of the Middle East, inland Australia, and the southwestern United States. Daytime air is often hotter than comfortable indoor temperatures, so the strategy flips: keep windows closed and shaded during peak daytime heat, and open them in the evening, overnight, and early morning to flush the home with cooler night air. This is sometimes called night purging, and it depends on operable windows placed to create a strong stack effect overnight.
Temperate Climates
This covers much of Europe, parts of North America, and temperate Australia. Ventilation needs shift with the seasons — generous cross ventilation in summer, but the same openings need to seal well and allow controlled, smaller-scale ventilation in winter. Operable windows with trickle vents or adjustable openings give homeowners control across both seasons without needing separate systems.
Cold Climates
This covers northern Europe, Canada, and similar regions. Here the priority is minimizing uncontrolled air leakage rather than maximizing airflow. Window area generally stays lower, and any ventilation strategy works alongside mechanical heat-recovery ventilation rather than replacing it. Even so, a well-placed, small operable window still helps clear humidity from kitchens and bathrooms without major heat loss.
💡 KEY INSIGHT
Climate does not change the physics of cross ventilation — it changes the schedule. Hot-humid climates want airflow constantly; hot-dry climates want it concentrated overnight; temperate and cold climates want it seasonal and controllable.
Climate Response Table
| Climate Type | Example Regions | Window Strategy | Best Time to Ventilate |
| Hot-Humid | Mumbai, Chennai, Singapore, Bangkok | Large, low-level openings on two walls; maximize daytime airflow | Most of the day, whenever breeze is available |
| Hot-Dry | Riyadh, Phoenix, inland Australia | Smaller, shaded openings; close at midday, open at night | Late evening through early morning |
| Temperate | London, much of Europe, coastal US | Operable windows with seasonal control; trickle vents for winter | Daytime in summer; brief periods in winter |
| Cold | Northern Europe, Canada, Scandinavia | Smaller openings; pair with mechanical heat-recovery ventilation | Short daily bursts to clear humidity |
✅ TIP
If you live somewhere with a clear hot and a clear cool season, like much of North India, plan for two different window-use habits rather than one fixed setup. The placement stays the same — only your daily schedule for opening and closing changes.
Getting the schedule right for your own climate also means knowing what not to copy from a different one.
The illustration below puts all four climate strategies side by side, so you can see how the same window-placement principles produce very different daily habits.
⚠️ COMMON MISTAKE
Copying a hot-humid ventilation strategy in a hot-dry climate. Leaving windows open all day in a desert climate pulls in superheated air and increases cooling load instead of reducing it.

5. Common Mistakes That Cancel Out Good Ventilation
Most homes do not lack windows — they lack the right relationship between the windows they already have. These five mistakes show up repeatedly, even in otherwise well-designed homes, and each one is fixable without major construction.
Mistake 1: All Windows on One Wall
Builders and homeowners often add windows for daylight and street views, without checking whether any two of them sit on different walls. A row of windows along one facade looks generous but creates almost no cross breeze, since there is no pressure difference between openings on the same wall.
Mistake 2: Blocking the Airflow Path
A sofa pushed against the wall below a window, a bookshelf placed between two openings, or a half-closed interior door can quietly undo good window placement. The air still needs a clear, mostly straight route from inlet to outlet.
Mistake 3: Ignoring Local Wind Direction
Window placement that ignores the site’s prevailing wind direction relies on luck. A home positioned so its main openings face away from the dominant breeze will underperform even with generous window sizes, while a smaller home aligned correctly can out-ventilate it.
Mistake 4: Same-Height Openings
Placing inlet and outlet windows at the same height uses wind pressure but throws away the stack effect entirely. This becomes especially costly on still days, when wind-driven airflow drops to nearly nothing and height difference is the only thing left working.
💡 KEY INSIGHT
Most ventilation problems are not about needing more windows. They are about the relationship between existing openings — their wall position, their height, and what sits in the path between them.
Mistake 5: Sealing Everything for Air Conditioning
Many homes that rely heavily on air conditioning end up with windows that are rarely opened, even during pleasant weather. Over time, occupants lose the habit of using natural ventilation at all, even on days when it would work perfectly well and cost nothing.
✅ TIP
Walk through your home on a mild, breezy day with every window open and a lightweight scarf or ribbon in hand. Hold it near each opening — if it barely moves, that window is not contributing to your airflow path and needs a partner opening.
That same test also reveals a habit many homes have slipped into without noticing — relying on a fan or AC unit to do a job natural airflow could handle for free.
⚠️ COMMON MISTAKE
Assuming a ceiling fan replaces cross ventilation. A fan recirculates the air already in the room; it does not bring in fresh outdoor air or remove built-up humidity and indoor pollutants the way a true airflow path does.
6. Your Room-by-Room Airflow Checklist
Bring everything together with a simple, repeatable checklist. Walk through it for every main room in your home — bedrooms, living areas, and kitchens benefit the most.
Step 1: Identify Your Exterior Walls
Count how many exterior walls each room has access to. This single fact determines whether single-sided, cross, or stack ventilation is realistic, and it should be the first thing you check before planning anything else.
Step 2: Check Your Opening Sizes
Measure your room’s floor area and compare it against your total openable window area. Use the 12 to 20 percent range from Section 3 as your target, and flag any room that falls below 10 percent for a possible second opening.
Step 3: Map the Airflow Path
Stand at your main inlet and look toward your main outlet. If furniture, closed doors, or partition walls block that direct line, that is your highest-priority fix — often solved by simply rearranging furniture or installing a louvered door.
💡 KEY INSIGHT
This checklist works in the order given because each step depends on the one before it. There is no point optimizing window size in Step 2 if Step 1 reveals the room has no real cross-ventilation potential to begin with.
Step 4: Match Strategy to Climate Schedule
Once placement and sizing are confirmed, set your daily window-opening habits using the climate guidance from Section 4. This step costs nothing and is often the most overlooked, since most homeowners use the same window schedule year-round regardless of climate.
Airflow Checklist
| ✓ I know how many exterior walls each main room has access to. |
| ✓ My main rooms have openable window area between 12 and 20 percent of floor area. |
| ✓ My inlet and outlet windows sit on different walls, not the same wall. |
| ✓ My inlet window sits lower than my outlet window wherever possible. |
| ✓ Nothing blocks the direct path between my inlet and outlet openings. |
| ✓ I know my site’s prevailing wind direction and have aligned my main openings to it. |
| ✓ My window-opening schedule matches my climate type, not a fixed daily routine. |
✅ TIP
Print this checklist and walk it room by room rather than trying to judge the whole house at once. Ventilation problems are almost always room-specific, not whole-house problems.
Once you have worked through the checklist for every room, you may want a single worksheet to keep track of what you found and what still needs fixing.
30-Day Action Plan
Use this week-by-week plan to turn this guide into real changes in your home, without needing construction work for the first three weeks.
Week 1 — Audit Existing Windows
- Walk through every main room and note which exterior walls each one has access to.
- Measure each room’s floor area and compare it against total openable window area.
- Mark which rooms fall below the 10 to 12 percent openable area target from Section 3.
Week 2 — Identify Airflow Paths
- For each room with two or more exterior walls, check whether existing windows could form a cross-ventilation pair.
- Identify your site’s prevailing wind direction using the ribbon test from Section 1.
- Note any furniture, curtains, or closed doors currently blocking a potential airflow path.
Week 3 — Improve Ventilation
- Rearrange furniture that blocks airflow paths identified in Week 2.
- Replace heavy curtains with lighter, airflow-friendly window treatments where privacy allows.
- Install or adjust louvered vents above interior doors in single-sided rooms to borrow airflow.
Week 4 — Reduce Mechanical Cooling
- Set a climate-appropriate window schedule using the guidance in Section 4.
- Track one week of natural-ventilation-only hours and compare comfort and electricity use against your usual routine.
- Flag any rooms that still feel stuffy for a longer-term fix, such as adding a second opening or a stack vent.
💡 KEY INSIGHT
The first three weeks of this plan cost nothing beyond your time. Only consider Week 4’s longer-term fixes, like adding new openings, after you have tested how far rearrangement and scheduling alone can take you.

Frequently Asked Questions
1. Do I need windows on opposite walls for cross ventilation to work?
Opposite walls give the strongest result, but adjacent walls at a corner still work if there is a clear, mostly direct path between the two openings. What matters most is a real pressure difference between the inlet and outlet, not their exact compass position.
2. How big should my windows be for good ventilation?
Aim for openable window area between 12 and 20 percent of your room’s floor area, based on common building guidance and code minimums. Below about 10 percent, airflow drops off noticeably, while going much above 25 percent starts adding more heat and glare than airflow benefit, especially in hot climates.
3. Can I add cross ventilation to a room with only one exterior wall?
Not true cross ventilation, but you can improve single-sided airflow by placing two windows at different heights on that one wall, or by adding a louvered vent above an interior door to borrow airflow from an adjoining room with a second exterior wall.
4. Does ceiling height affect how deep a room can be and still ventilate well?
Yes. Natural ventilation guidance generally limits single-sided ventilation to a room depth of about 2.5 times the ceiling height, and cross ventilation to about 5 times the ceiling height. A taller ceiling allows a deeper room to still ventilate effectively.
5. Should I keep windows open all day in a hot climate?
It depends on humidity. In hot-humid climates, keeping windows open most of the day usually helps, since moving air is the main cooling tool available. In hot-dry climates, it is usually better to close windows during peak daytime heat and open them at night, since daytime air is often hotter than you want indoors.
Quick Wins Checklist
Short on time? These five changes deliver most of the benefit without any construction.
| ✓ Open windows on two different walls, not just one, to let air pass through instead of pooling near a single opening. |
| ✓ Keep at least 10 to 20 percent of your room’s floor area as openable window space for reliable cross ventilation. |
| ✓ Place the inlet window low and the outlet window high on the opposite wall to use both wind pressure and rising warm air. |
| ✓ Remove furniture, curtains or screens that block the direct path between your inlet and outlet openings. |
| ✓ Open windows during the coolest hours — early morning and after sunset — in hot-dry and hot-humid climates. |
Continue Exploring
Window placement is one piece of a larger passive design system. These related topics build directly on what you just learned.
- Passive Cooling Strategies for Tropical Homes — how shading, materials and ventilation work together to reduce indoor heat.
- Coming Soon – Understanding the Stack Effect in Residential Design — a deeper look at vertical airflow and when to use clerestory windows.
- Coming Soon – Choosing the Right Window Type for Cross Ventilation — casement, louvered, and sliding windows compared for airflow control.
- Coming Soon – Climate-Responsive Home Design: A Beginner’s Guide — how hot-dry, hot-humid, temperate and cold strategies differ across every part of a home.
Call To Action
Ready to put this into practice? Download the Natural Ventilation Planner and walk through your home room by room this week. It is the same checklist and matrix from this guide, formatted for printing and on-site use.
DOWNLOADABLE RESOURCE
Natural Ventilation Planner — a printable worksheet covering the Window Placement Matrix, the Airflow Checklist, and a room-by-room planning grid from this guide. Use it alongside your 30-Day Action Plan.
If you are working with an architect or contractor, bring your completed planner to your next design conversation. A clear airflow path drawn on your own floor plan is one of the most useful things you can hand a designer before windows are finalized.